Learning Experiences
Once upon a time . . . in a far away land . . . no wait . . it wasn’t really that far. It was our basement actually. There was a place FILLED with books. (How does this relate to a garbage can holder? Read on.) The culmination of Peggy and I’s households made for a rather large collection of books. We’re both avid readers, as is our family, so we have volumes of books. We needed more shelving and the existing shelving that we had was not quite designed to be up to the task of holding books per se. They were particle board (using that term loosely) ones and already they were bowing under just the strain of the meager things we had in them. We decided that we’d build bookshelves for the basement.
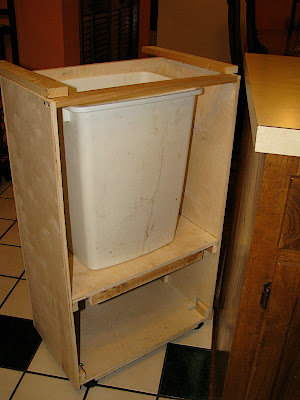
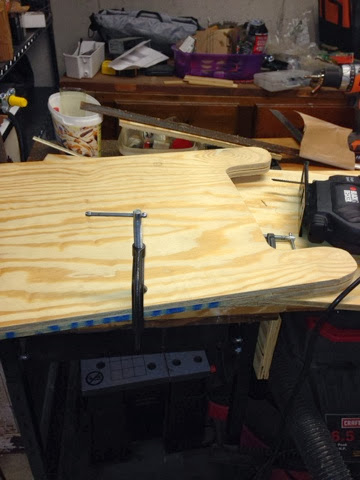
My “new to me” Shopsmith was a bit intimidating so my wife and I began to think of projects that would allow us to learn the ins and outs of it’s operation and be useful also. I had envisioned a roll-out pantry for in our kitchen, but the sticking point was the trash can that currently resided there. We looked around and couldn’t quite come up with a good place for the trash can so the idea was hatched to make a holder as an extension of our kitchen peninsula. After purchasing some lumber and cutting things up, this is what we had:
.JPG) |
| From My Old Garage |
About that same time we decided that perhaps the Christmas gifts project would be another good learning experience and the can holder went into limbo. Last night we started back in earnest on the garbage can holder to get it done, operational, and out of the garage. (See cleaning . . . . whew!)
Now my dad had brought me over the Kreg videos on Cabinetmaking and Trim Carpentry. Peggy and I watched the Trim Carpentry one and were thoroughly impressed. I thought “Hey, that’s pretty easy” and she reminded me that the individual had years of experience and a “cut/paste/rewind” for mistakes. I kind of scoffed and grabbed my Kreg tool and went to work. Oooooof.
My first experience with the tool was not the best . . . I had mitered a door for the front of the can holder and attempted to screw it together with the Kreg tool. The first part that was bad was I had used my son’s sliding compound saw . . . and realized AFTER the cuts how far out it was. It wasn’t cutting anything close to a 45 degree angle, or straight for that matter. I grabbed my square and got it back in shape . . . but the Kreg tool is not the ideal thing for end grain. After getting the door and panel put together I saw back and admired my work . . . no, let me re-phrase that . . . I was disheartened by my work. It wasn’t at all like I was hoping for. I tore the door frame apart and left the pieces for cull pile . . . destined to be sacrificial boards for in the future. (Which I learned about while working on that coaster project . . saves the tear out!)
I bravely decided that this time around (after watching the video) that I would be the “MASTER” of the Kreg tool. I don’t have the handy handheld clamp, so instead I use a threaded clamp. That’s kind of awkward. I carefully cut my board and drilled my holes. I screwed it together and realized the screws went right out the end of the other peice. DOH! I rummaged around in the Kreg starter kit box and found some shorter screws, but they were also slightly smaller and not happy in the holes. In disgust I tossed the tool aside, and screwed some drywall screws in the end. I had originally glued and nailed a board in place, but when I cut the board I measured the opening . . . not the actual size it was SUPPOSED to be. The boards were flared out and I had glued them in place just so . . . so last night I was fixing that mess with this Kreg tool adventure.
By now I was getting a little miffed at the tool. I decided to cut some trim boards for the sides of my cabinet. I didn’t have any side boards, so I took a 1×6 and ripped it to give me 2 1×3’s. I decided to put the rough edge through the jointer and clean all the sides up. It was kind of awkward on that also since my jointer blades have a small nick. I kept getting a little ridge on the boards. I got everything sorta close and decided to put the one board in place for across the bottom. Now it was too thick, so off to the jointer for it. At some point this board must have been on the floor and it picked up a little metal shaving—well guess what found it? Now I have TWO nicks in my blades. (Thankfully I have a brand new package of blades, but I figured I’d leave them off until I had all my “learning” experiences out of the way.) I dug the shaving out with my pocket knife and now was rewarded with a wonderful “quarter round” ridge on my planed boards. I move the fence back and forth and tried to work around the problem the best I could.
Finally I decided . . . the rest can be touched up with the sander . . . let’s screw some boards together. I grabbed my venerable Kreg tool again and made some holes. I screwed first board together and promptly split out the side of my freshly jointed boards. ARGH! I was determined to figure out the tool, so I adjusted it a bit further back and drilled more holes . . . . again far too shallow. I adjusted it forward and drilled again and finally had success. The board looks like swiss cheese, but I was at least able to make a good tight joint. I flipped the board around and did the same on the other side, but instead of 6 holes I was able to reduce it to 4 holes on that side. (The initial two wrong ones plus the new right ones.) I put my triumpant frame peice (minus the last part to close the gap) aside.
 |
| From My Old Garage |
At this point I was feeling a little on the frazzled and disappointed side. I kind of looked like a wood worker, but alas my skills were certainly lacking. Clothes in this case don’t necessarily make the man. :-)
 |
| From My Old Garage |
I decided to screw the wheels onto the cabinet to at least see how well that would work. I got them on and took the cabinet upstairs to see how everything was going to work out.
 |
| From My Old Garage |
Now again—this is “TRUE CONFESSIONS” time. I could BS you and say that it was all planned and everything works out, but as you know from reading my “master carpentry” skills above, nothing is quite that easy. I rolled the cabinet up to the place and wasn’t exactly happy with it’s feeling. The wood on the one side makes it slightly tipsy—a bit heavier there. I had recessed the wheels too making sure to avoid the sides and keep the casters turing/rolling properly. I was looking at it and thinking “ugh . . it doesn’t have the door on, it doesn’t have the lid . . . it’s not going to work right. I was thinking it was sticking too far out with a lid on top, and Peggy agreed it would look a bit out there. I was sitting there thinking about it when a voice in my head whispered “turn it around.”
 |
| From My Old Garage |
 |
| From My Old Garage |
 |
| From My Old Garage |
Ok—so suddenly my “great garbage can caper” was suddenly looking like a very slick project. By turning it 180 degrees suddenly the CABINET becomes the door. I can simply roll it out slightly to change the bag. The wheels were originally to be able to move the cabinet to wherever you needed it, but now they act in a dual purpose. The space down below is for storing garbage can bags. I will make a frame for the top and lid, and it will be done. I have some trim pieces for the side to hide the plywood edges. Peggy thought that was a very great idea . . . no doors, no hardware hanging out to snag you. It was like the perfect solution.
So I’ve learned quite a bit along the way here. The first thing is that my projects from the past were generally a lot better when I carefully drew them out and planned everything from the get go. I didn’t do that on this project . . . I figured how hard would it be to build a box around a trash can. Originally I had a double hinged door setup that was going to allow the top to fold back and then the side to fold out (on chains) to let the trash can be changed. That changed to a door setup, with the top door for the trash can and the bottom a drawer for the bags. Then it was going to be a double door when I realized they don’t make drawer slides that short. Then it went to a single door. It’s been quilte a process . . . now we’re at no door (backed up the cabinet) and just the lid on top. Whew! Next time I’ll begin with the end in mind so to speak. (I know . . Steven Covey stuff!)
I’ve also learned that sometimes the pro’s make things look so easy. I’ve watched a lot of videos and perused a lot of books and websites and it all looks very straight forward. It was like that with the thought of collecting the dust. The hoses are very stiff and the plastic adapters on the Shopsmith are very strained with the octopus setup on there. You can see the hoses from purgatory setup here on the jointer.
 |
| From My Old Garage |
 |
| From My Old Garage |
I’m learning—it’s a slow process but my wife is a very great cheerleader for me. She was just having the discussion with one of my sons the other day on learning things and things taking time. I didn’t exactly heed that advice but I’m not completely unteachable. I’ll take my mangled wood and continue soldiering on while learning the skills I need to make better projects in the future.
 |
| From My Old Garage |

Comments